 |
|||||||||||||||
|
|
|||||||||||||||
       |
Letters Vol. 6, No. 11, pp. 38–43, Nov. 2008. https://doi.org/10.53829/ntr200811le1 On-site Assembly of Optical Connectors for
|
||||||||||||||

| † | NTT Photonics Laboratories Atsugi-shi, 243-0198 Japan |
|---|
1. Introduction
The expansion of optical communication through the use of fiber-to-the-home (FTTH) access has meant that making optical connections on site has become very important. Although an FTTH field assembly (FA) connector that can be assembled very rapidly and easily has been developed for field use [1], commonly used highly efficient single-fiber connectors, such as the SC and MU connectors, have been difficult to assemble on site. These highly efficient connectors produced in factories are unsuitable for on-site assembly because they require a complicated multistep process performed by skilled workers. Moreover, assembly takes a long time because it includes adhesion and polishing. Nevertheless, telecommunications buildings where connectors must be installed or removed require on-site assembly of durable high-performance connectors such as SC and MU connectors if we are to obtain optical fiber cord with sufficient tensile strength for optical fiber line construction and repair [2].
We have achieved the first quick and easy on-site assembly technique for SC and MU connectors by utilizing our newly developed rapid adhesive, assembly tools, and one-process-step polishing machine.
2. On-site optical connector assembly
The optical connector assembly process consists of three steps: (1) adhesion of the optical fiber to a ferrule, (2) polishing of the ferrule and optical fiber end, and (3) assembly. A time chart of the conventional connector assembly process is shown in Fig. 1 (top). Fixing the fiber to the connector ferrule has thus far required an excellent epoxy adhesive because good connectivity must be guaranteed at various temperatures. However, it takes more than 30 minutes at a temperature above 100°C to form a strong bond by heat-curing the adhesive. On the other hand, in the polishing step, rather large rigid machines are used in optical connector assembly plants, and the many polishing sub-steps require several tens of minutes to complete. Each of these machines polishes 12 or 24 ferrules simultaneously, so in a plant, the polishing time per connector is very short. However, on site where only one ferrule is needed at a time, polishing takes several tens of minutes. When we add together the times needed for these two steps and the final step of assembling the many plastic parts, we find that the conventional assembly method takes more than 60 minutes.

Fig. 1. Optical connector assembly times.
For the first step, we developed a new cyanoacrylate adhesive. This family of adhesives, which is commonly known as Superglue, does not need heating or a long curing time, despite the severe connection conditions required with optical fiber connectors. For the second step, we also developed a new on-site polishing method, which can polish ferrules quickly and effectively. These new developments reduce the total on-site optical connector assembly time to only 12 minutes.
Another important point regarding on-site assembly is ease of operation. It is important for anyone to be able to assemble a highly efficient connector easily at any location without extensive training. We have developed tools for using the new adhesive. They enable the required amount of adhesive to be obtained simply by placing the ferrule holder on the adhesive plate. With our new machine, a user can polish the end plane automatically simply by pushing one button (one-step polishing). This makes polishing very easy, which in turn eliminates the need for a skilled optical fiber wiring worker. Details are given below.
3. Adhesive and adhesion tools
The adhesive must have a sufficiently high strength. The adhesion must hold the fiber and ferrule rigidly over a large temperature range in spite of the large differences in the thermal expansion coefficients of these materials. To achieve such high strength, it was thought that epoxy adhesive was essential. However, we have developed a new cyanoacrylate adhesive with sufficient strength that can withstand a wide range of temperatures. During the curing process we use a primer. However, unusually, this primer is designed to delay the onset of hardening, instead of to accelerate curing and hardening. In this case, fast curing would prevent sufficiently strong adhesion being achieved between the optical fiber and ferrule hole because the gap between the optical fiber and ferrule is very narrow (less than 1 µm). Because of this very thin adhesive layer, the hardening starts immediately upon insertion, and the adhesive is not strong enough after the insertion is complete. When our new primer is used, the hardening starts after insertion is complete and we obtain sufficiently strong adhesion.
The adhesion procedure and tools are shown in Fig. 2. The ferrule holder was designed to play several roles and is capable of continuous use during the procedure. As shown in Fig. 2, the application of primer to the fiber and the filling of the ferrule with adhesive, which are important stages in the procedure, are controlled by the wetness of the primer on the fiber surface and by capillary action at the ferrule end, respectively. This liquid self-control mechanism enables anyone to fix a fiber to a ferrule with good reproducibility. Sufficient strength for the next polishing step can be obtained about five minutes after adhesion.
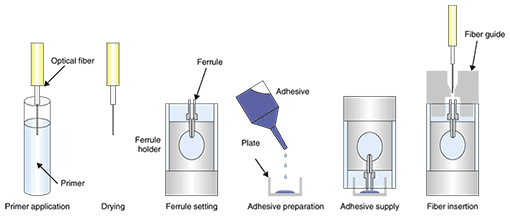
Fig. 2. New tools and assembly process.
4. One-step optical connector polishing machine
In addition to the quick and easy operation described above, this machine requires high precision machining to meet the connector end plane shape specifications. It must be small and light and have low power consumption so that it can run on small batteries. Low cost is also important.
The conventional polishing process is shown in Fig. 3(a). First, the excess length of the adhered fiber is broken off. Then, in the first polishing step, the fiber with the adhesive is machined to the same plane as the ferrule end. In the second polishing step, the connector end is machined to a hemispherical plane with an abrasive suitable for high-speed polishing such as diamond. In the third step, the very smooth and almost undamaged plane is polished with silica abrasive. Abrasive film is used for all the steps. After each step, the ferrule end plane is carefully cleaned to avoid any undesired effects in subsequent steps.
Our new polishing process is shown in Fig. 3(b). We have reduced the number of process steps. First, we use a simple new tool to break off the fiber at the level of the ferrule plane, as shown in the figure. Then, we use our new polishing method, which can machine a hemispherical shape at high speed and achieve good smooth plane finishing in one step [3].
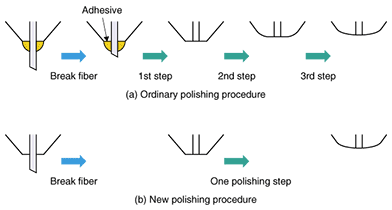
Fig. 3. Polishing process.
The polishing process for the new one-step polishing procedure is shown in Fig. 4. A diamond film for high-speed polishing and a silica film for finishing are set on the same polishing plate. The polishing begins at the starting point shown in the figure. This figure shows a schematic diagram of the relative trajectory between the polishing plate and the ferrule end (fixed on the machine). The polishing plate rotates slowly with small-radius high-speed revolutions. The machining point moves continuously from the rough polishing area to the finishing area and the polishing is completed at the end point. In this process, polishing water is supplied at the start point and used throughout the entire procedure, and there is no need for cleaning or water replacement. This makes the machine very simple and polishing is completed easily in only one step.
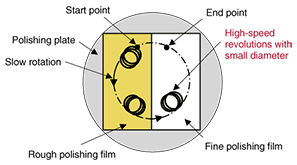
Fig. 4. New polishing process for one-step finishing.
However, until recently there had been a big problem with this process: it could not achieve a high-quality finish. Debris and abrasive dropping from the film in the rough polishing area were transported to the finishing area by the polishing water. These materials can cause significant damage to the polishing plane during finishing. So it was generally necessary to use a cleaning procedure and to change the water after rough polishing. In our new process, however, because the polishing plate revolves at high speed and has a small diameter, the water is stirred strongly. As a result, the floating debris and dropped abrasives are forced to the edge of the water region. The water used in the process is maintained around the ferrule holder by meniscus force. Because there is no debris or dropped abrasive at the ferrule end plane (polishing point), the optical connector end plane is well finished without scratches.
Our on-site optical connector assembly kit is shown in Fig. 5. Our new one-step polishing machine can be seen in the center of the figure. The diameter, height, and weight of the machine are about 85 mm, about 150 mm, and 1.5 kg, respectively. This is small enough to be called portable. The polishing time for the one-step procedure is 120 s. The total process time is shortened because there are no step intervals.
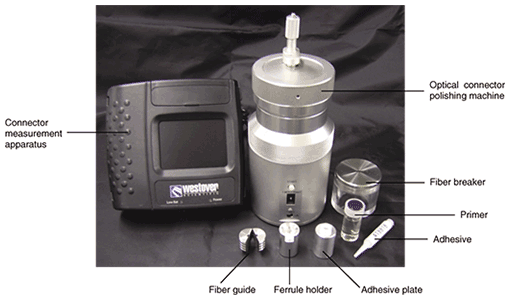
Fig. 5. On-site optical connector assembly kit.
5. On-site optical connector
A typical example of a polished plane is shown in Fig. 6. The figure shows a smooth plane without scratches. 98% of planes had similar surfaces. The machine performs with high reproducibility. The optical and shape characteristics of a finished plane are shown in Fig. 7. All the specifications for a connector end plane are met. The return loss, which acts as an indicator of damage, has a sufficiently high value of more than 50 dB.

Fig. 6. Typical finished end plane.

Fig. 7. Characteristics of finished connector end plane.
In an environmental test, these connectors satisfied NTT specifications for SC/MU optical connectors. Moreover, no problems arose under Telcordia GR326 test conditions. These connectors will provide the same level of performance as those fabricated in factories.
6. Summary
The time consuming and complicated on-site assembly of optical connectors has been greatly improved through the development of a cyanoacrylate adhesive, one-step optical connector polishing machine, and assembly tools. Connectors assembled with this new method perform with almost the same efficiency and environmental durability as those fabricated in a factory. This new assembly technique is expected to be used for various purposes including connector repairs in telecommunications buildings as optical telecommunications continues its rapid expansion.
References
| [1] | M. Kama, H. Tanase, Y. Oda, M. Awamori, T. Nakajima, and H. Watanabe, “R&D Toward Cost Reduction and Quick Response to Increasing Demands for Optical Services,” NTT Technical Review, Vol. 5, No. 2. pp. 25–31, 2007, https://www.ntt-review.jp/archive/ntttechnical.php?contents=ntr200702025.pdf |
|---|---|
| [2] | S. Yanagi, M. Kobayashi, S. Hosono, R. Nagase, S. Matsui, and S. Ohki, “Rapid Assembly Technique for Optical Connector, IEICE Trans. Electronics 2006, E89-C, pp. 1227–1232; doi:10.1093/ietele/e89-c.8.1227. |
| [3] | S. Matsui, S. Ohki, S. Yanagi, and R. Nagase, “Development of One-step Optical Connector End Polishing Machine,” J. Jpn. Precision Engineering Soc., p. 306, 2006 (in Japanese). |
 |
|
|---|---|
 |
|
 |
|